
Members and invitations
For admins
Admin → Members is where people come into the workspace and where you keep their details up to date. You can invite someone by email, share a link anyone can join with, change a member’s role template and reporting lines, and remove people who have left.
Before you begin
Section titled “Before you begin”- Your role template needs members. The Owner always has it.
- Editing a member’s details also needs hierarchy, and changing their role template needs role.
- On the Free plan, a workspace can have up to 5 members, the Owner included. Pending invitations and invite links hold places too. Pro and Max have no member limit. See Plans.
The card at the top of the page shows how many members you have and, on Free, how many places are left. When every place is taken, revoke a pending invitation or an invite link to free one, or move to a plan without a member limit.
Invite people by email
Section titled “Invite people by email”-
Select Admin in the rail, then Members.
-
Select the ⋮ menu at the top right of the page, then Invite by email. A panel opens on the right.
-
Type the person’s Email address.
-
Choose a Role. Invitations start on the built-in Member role template; pick another if they need more or less. See Role templates.
-
Optionally fill in Designation, Department, Manager and IT Manager. These are applied when they accept.
-
To invite more people at once, select Add another and fill in the next row.
-
Select Send invites.
Each person gets an email with a link to join. If an email can’t be sent, the invitation still works: open the ⋯ menu on their row in the members list and select Resend & copy link, then send them the link yourself.
Share an invite link
Section titled “Share an invite link”An invite link lets anyone who has it join, up to the number of uses you set. Use it for a team you trust, not for a public page.
-
Select the ⋮ menu at the top right of the page, then Invite by link. A panel opens on the right.
-
Set Max uses: how many people can join with it.
-
Choose an Expiration: 1 hour, 1 day, 7 days, 30 days or 90 days from when you create it. It starts on 7 days.
-
Choose a Role, the same choice as for an email invitation. Links start on the built-in Member role template; pick another if the people joining need more or less. Only the Owner and people with workspace administration can pick a role template that grants workspace administration. See Role templates.
-
Select Create link.
-
Under Copy this link now, copy the Join link and share it.
The card shows how many of the link’s uses are taken, the access it gives and when it expires. On the Free plan a link holds all of its uses up front, so a link for 3 people takes 3 places until it’s used up or revoked.
To give people a specific role template, invite them by email, or change their role after they join.
Pending invitations
Section titled “Pending invitations”Invitations that haven’t been accepted appear in the members list as Pending, or Expired once their link runs out. An expired invitation frees its place on its own.
From the ⋯ menu on an invitation you can:
- Resend & copy link: send a fresh email and copy the new link. The previous link stops working.
- Revoke invitation: cancel it and free its place.
The members list
Section titled “The members list”The list shows each member’s Role, Designation, Department, Manager, IT Manager and State. The Owner’s role reads Owner.
- Manager builds the org chart on Hierarchy.
- IT Manager is the person who reviews this member’s requests when their role template asks for approval. See Approvals.
Edit a member’s details
Section titled “Edit a member’s details”-
On the member’s row, open the ⋯ menu and select Edit details.
-
Change Designation, Department, Manager or IT Manager. Nobody can be their own manager.
-
To change what they can do, pick a different Role. The Owner has no Role field, because the Owner always has full access.
-
Select Save changes.
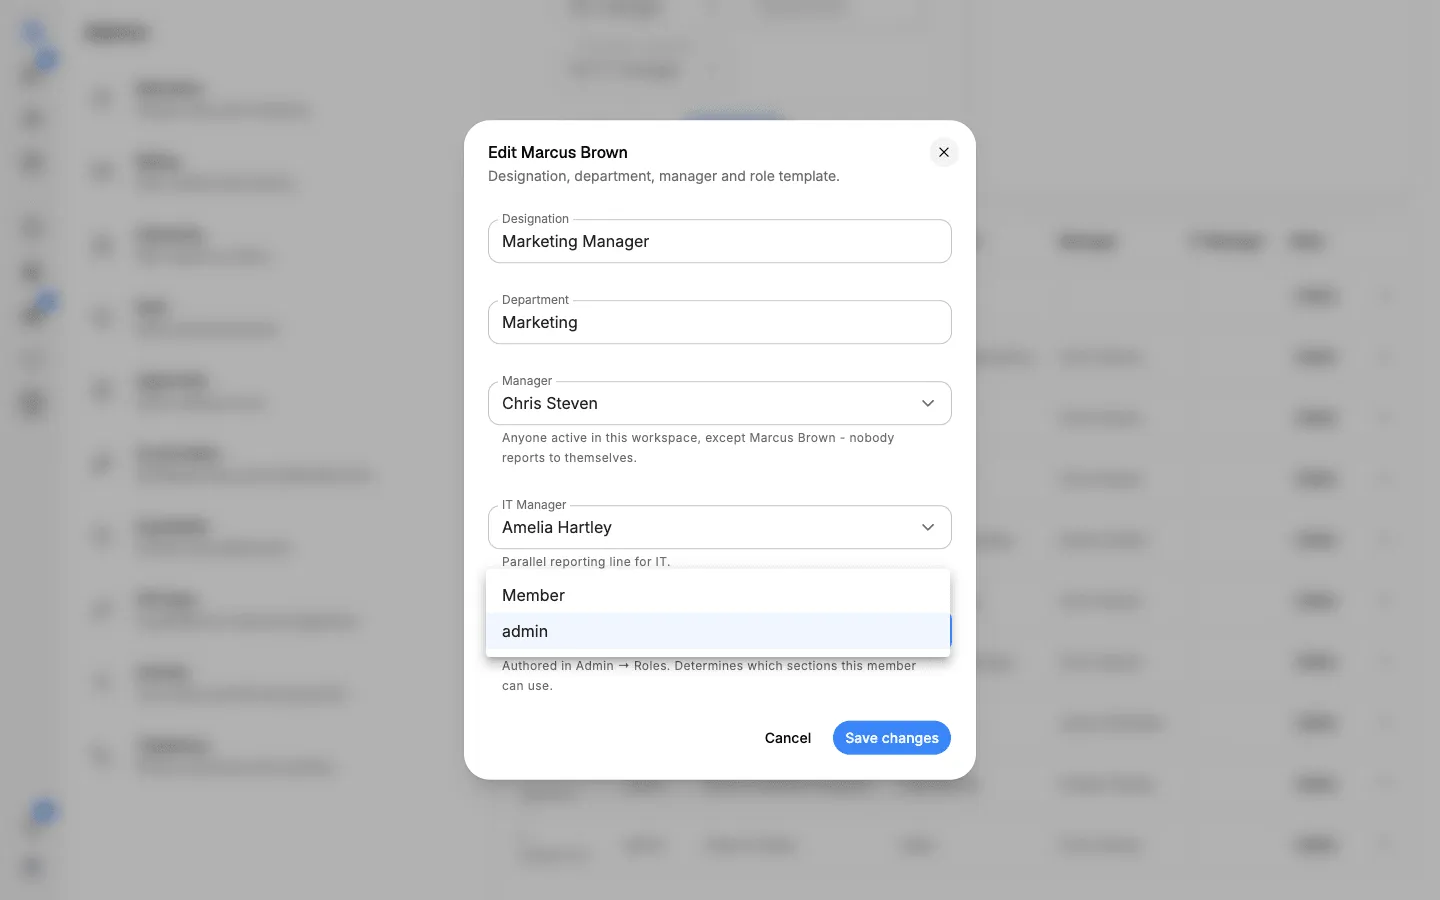
Role templates that include workspace administration are grayed out unless you are the Owner or have workspace administration yourself.
Remove a member
Section titled “Remove a member”On the member’s row, open the ⋯ menu and select Remove from workspace. They are removed straight away.
When someone is removed:
- They are signed out of the workspace and lose access to it.
- Anyone who reported to them has no manager or IT manager until you set a new one.
- API keys they created stop working.
You can’t remove yourself or the Owner.
The Owner
Section titled “The Owner”Each workspace has exactly one Owner. The Owner can’t be removed, has no role template and can always open every Admin area.
Ownership isn’t given through an invitation or a role template. If ownership needs to move to another member, contact support.