
Create a breakaway
You create a breakaway from inside an AI chat. First you tick the messages the work is about, then you choose who takes it and write a short brief. Only what you tick and add goes with it.
This page covers a breakaway from an AI chat. To make one from messages in a team, see Turn messages into a task.
Before you begin
Section titled “Before you begin”- You need an AI chat that you are working in. A breakaway is made from your own chat.
- To hand the work to one of your agents, you need your own subscription or API key for the model that agent uses. See Who can take a breakaway.
- Pixies appear in the list only if your role is allowed to place calls.
Choose what to carry
Section titled “Choose what to carry”-
Open the AI chat.
-
Right-click the message the work is about and select Create breakaway. You can also hover over the message, open its menu from the arrow in its corner, and select Create breakaway there.
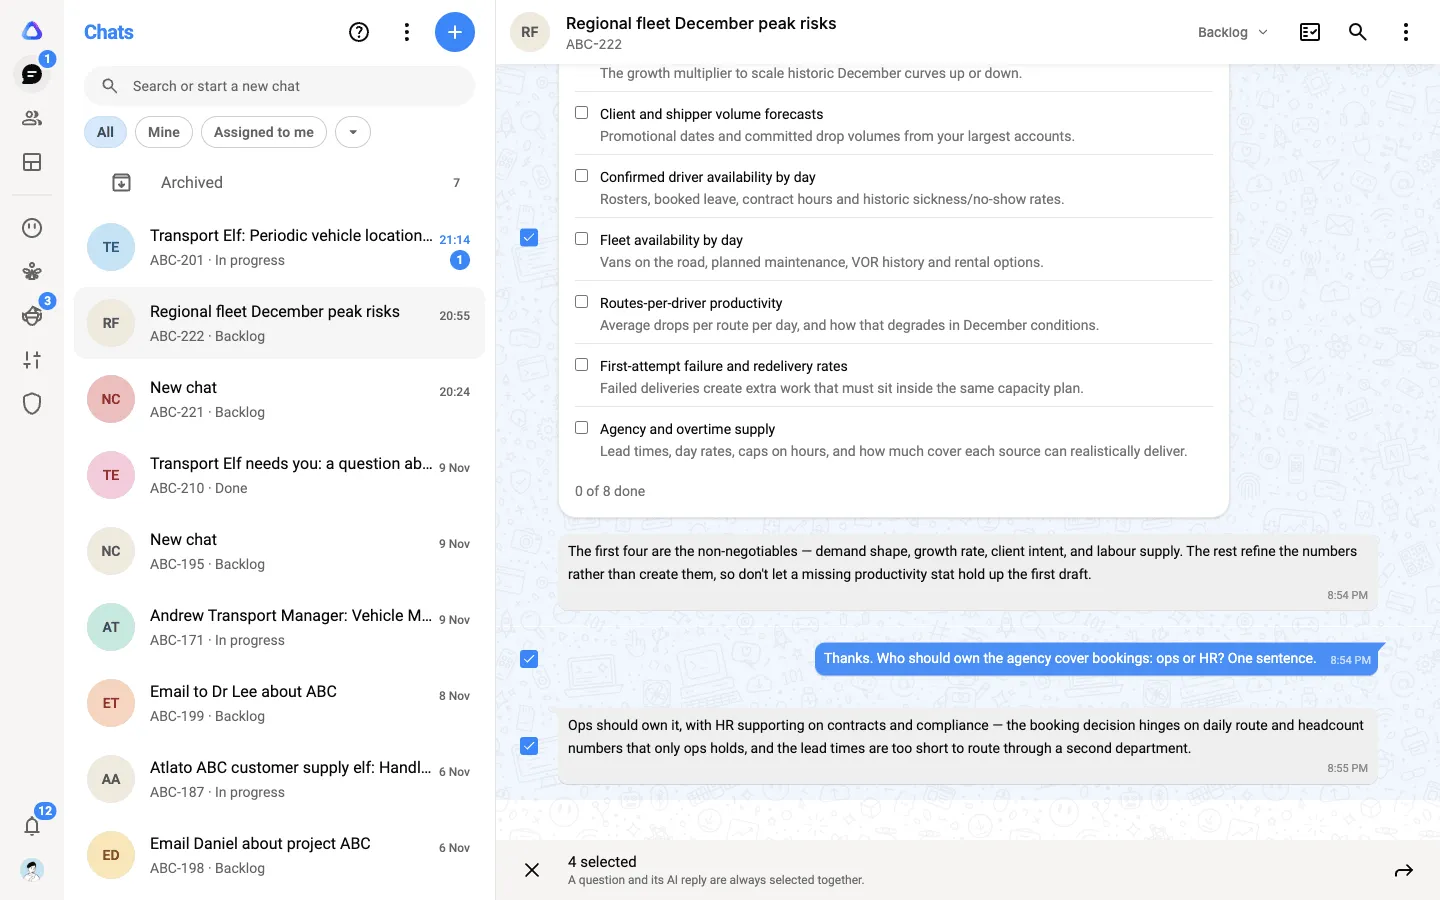
The message box is replaced by a selection bar, with that message already ticked.
-
Tick any other messages you want to carry. A question and its AI reply are always selected together, so ticking one ticks both.
-
Select the arrow at the right of the selection bar.
You can also select Create breakaway beside the message box, which opens the selection bar with nothing ticked yet. To start one that carries no messages at all, select Task options (⋮) at the top of the chat, then Create breakaway.
Choose who takes it
Section titled “Choose who takes it”The Select member or agent screen lists everyone and everything you can hand work to. Use the chips (All, People, Agents, Elves, Pixies) or the search box to narrow it down, then select a name.
What happens next depends on who you pick. See Who can take a breakaway for each option.
Write the brief
Section titled “Write the brief”The steps below are for a breakaway to a person. An agent or an elf skips Set priority & due, and a pixie has steps of its own (see Call breakaways). Select the round arrow at the bottom of each step to move on, or the back arrow at the top to change an earlier answer.
-
Add Breakaway details. Type a Chat Name. This is required, and it names the chat in the assignee’s Chats list. To give it a picture, select the circle and upload a photo or pick an emoji. Leave it blank to use the name’s initials.
-
Add media, links and docs. Files attached to the messages you ticked are already selected. Select Media, links and docs to add more: photos and videos (Media), documents (Docs) or web addresses (Links), either new from your device or picked from this chat. Each file is copied for them, so your own copy stays where it is.
-
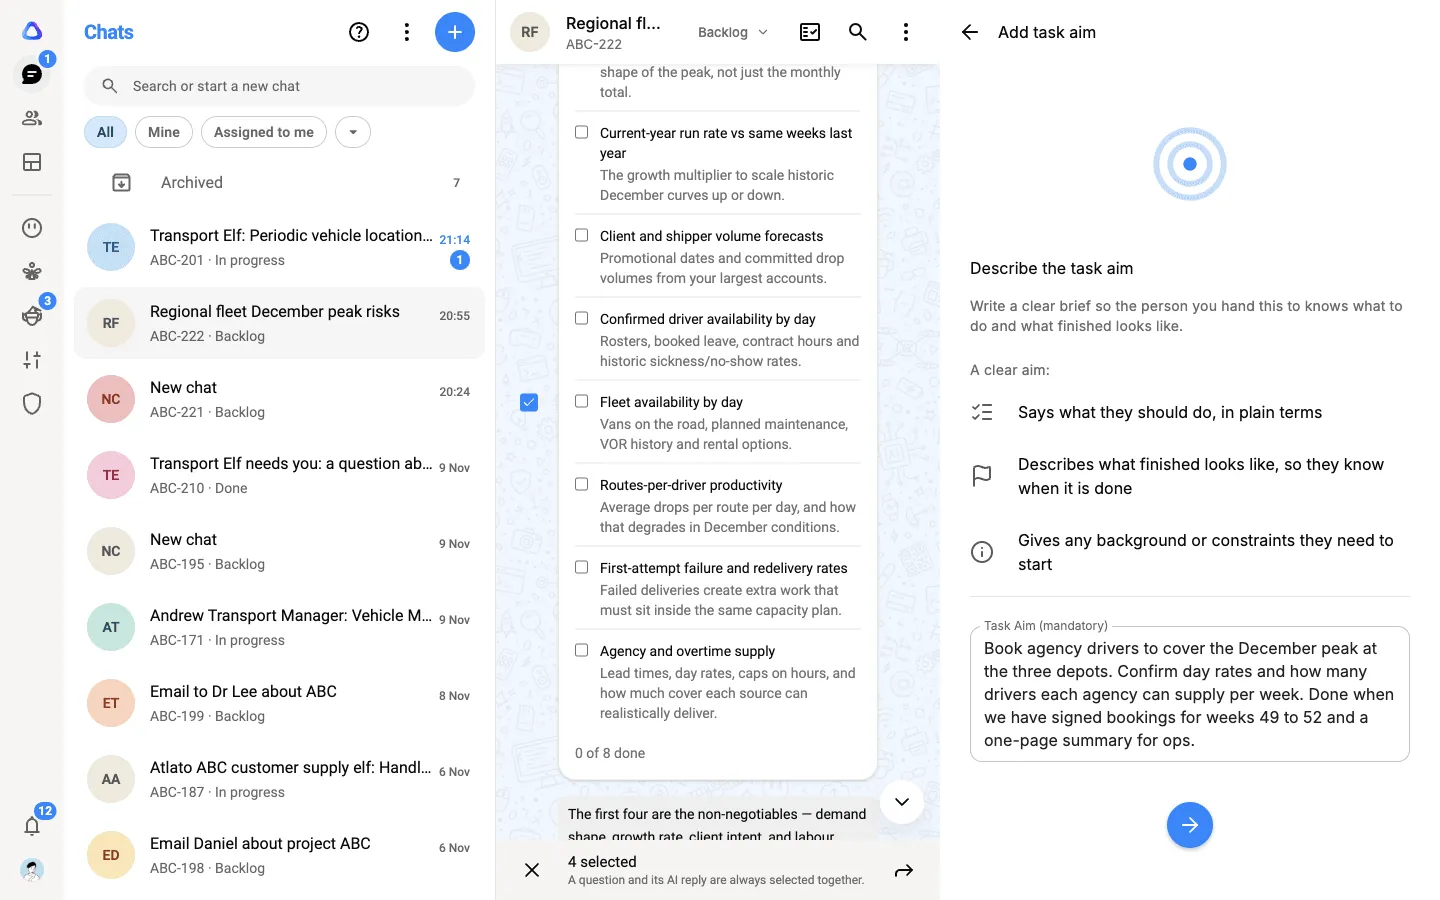
Add task aim. Describe the task in the Task Aim box. This is required. A good aim says what to do, what finished looks like, and any background they need to start.
-
Add deliverable. This step is optional. Select Deliverable type and pick one or more formats you want handed back: PDF, Excel, MD, Docx, PPTX or Other. Leave it unset if any format will do.
-
Set priority & due. Both are optional. Choose a Priority (Low, Medium, High or Urgent) and a Due date to show how urgent the work is.
-
Select Create breakaway, the round check button at the bottom of the step.
You stay in your chat, and the breakaway’s card is added to the chat’s Approvals & Submissions panel (the button at the top of the chat). The person you chose gets it as a new chat, with your brief and the messages you carried.
When you hand it to an agent
Section titled “When you hand it to an agent”An agent starts work the moment you create the breakaway, so there is no priority or due date to set. On the last step, the agent’s apps are listed under Apps this agent uses. The agent works with your own sign-ins, so select Connect beside any required app you haven’t connected. After a first sign-in, a window shows what the app’s tools may do (see Use connected apps in a chat); select Done to come back to the form. If you would rather send it now, select Send anyway: the agent starts without the missing apps and tells you what it could not do.
When you hand it to a pixie
Section titled “When you hand it to a pixie”A pixie’s call waits for you to start it. As soon as you create the breakaway, the panel beside the chat opens Approvals & Submissions on the call’s card, where you select Call now or Schedule it later. See Call breakaways.
If it can’t be created
Section titled “If it can’t be created”If you see It could not be created. Try again., everything you filled in is kept. Check your connection and select Create breakaway again.